今回iFixitが分解したのはMacBook (Retina, 12-inch, Early 2015)のベースモデル(Intel Core M-5Y31, 256GB SSD, 8GB Memory)モデルナンバーA1534で、最終的には今までのMacBookシリーズの中でも最も修理するのが難しいRepairability”1″という評価を下しています。詳細は以下から。
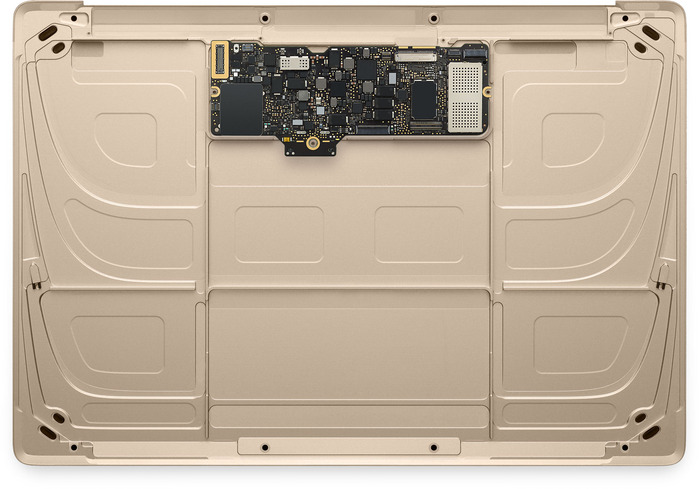
ボトムケースネジ
新しいMacBookのボトムケースのネジは従来通りMacBook AirやPro, iPhoneなどでAppleが使用している不正開封防止用の星ネジ”5-point pentalobe screws“で、このネジを8本外すことで内部へアクセス可能となります。
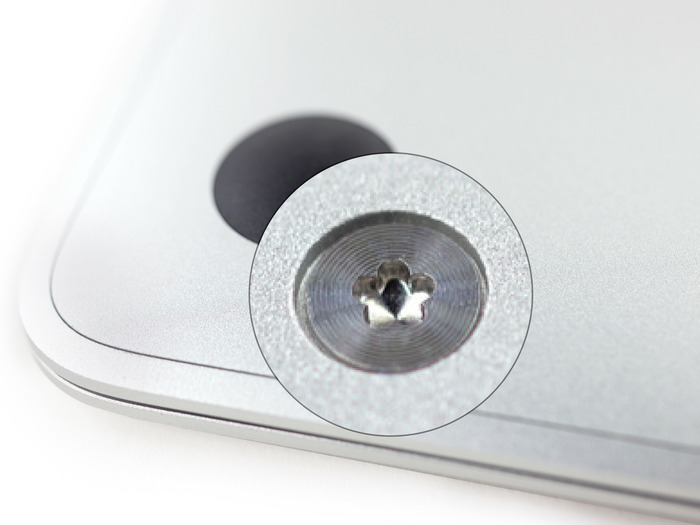
This may be the future of laptops, but Apple has stuck to their tradition of using tamperproof 5-point pentalobe screws for the new MacBook. Le sigh.
ボトムケースについてくるロジックボードとバッテリー
ネジを外しボトムケースを持ち上げると、ケーブルが見え魔法のようにボトムケースにバッテリーとロジックボードが落ちずに付いてきます(後述しますが接着剤で付けられています)、FPCケーブルが張っているため、ヒンジを支点にボトムケースを開け、ケーブルをコネクタから外しボトムケースを取る必要があります。
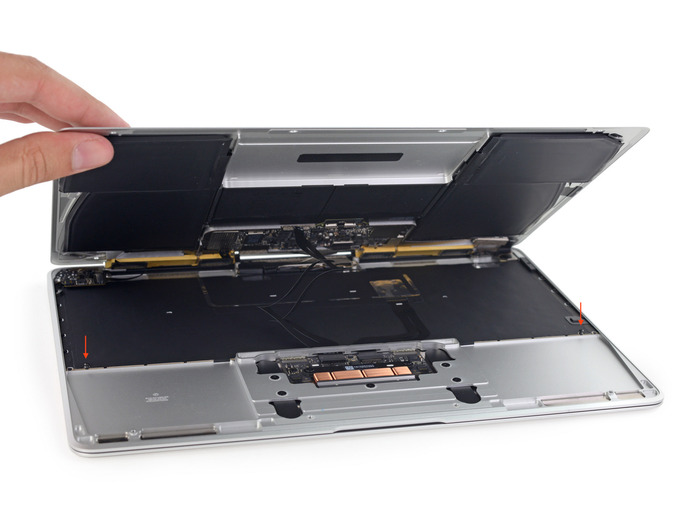
What is this new devilry? Cables!? A battery and logic board in the lower case?
[…]
The standard pop-open-at-the-hinge practice still holds, but then the cables go taut. Then you have to hinge the case back forward to access the connectors and open the case.
また、今までのMacBookに付いていたようなプラスチッククリップは新しいペグとクリップに変更されています(上図の赤矢印)。
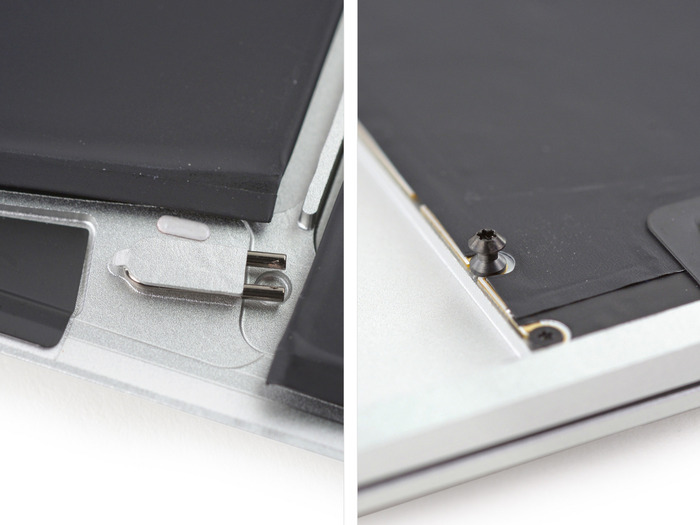
The standard plastic clips of old are replaced with futuristic pegs and weird spring clips.
ボトムケースを開く
ボトムケースを開くにはまずMacBook Pro (Retina, Early 2015)にも採用されている感圧タッチトラックパッドとキーボードに接続されているケーブルを外します。
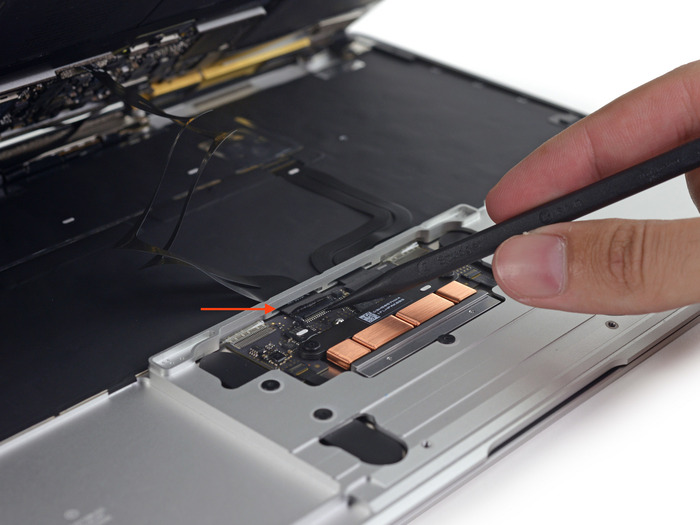
Reminiscent of the Macbook Pro 13″ Retina released in March, this MacBook comes equipped with the fancy Force Touch trackpad. We disconnect the trackpad/keyboard cable for a little more maneuvering room.
感圧タッチトラックパッドとキーボードが接続されたケーブルを外すとやっとボトムケースを180度開くことが出来ますが、まだヒンジ周辺にはFPCケーブルが接続されています。
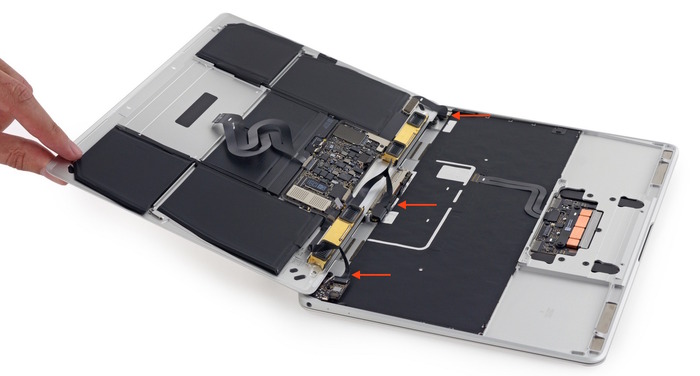
With the springy trackpad/keyboard cable disconnected, we can fold the whole enchilada flat on the table. Time to survey the field and see what we’re up against this time.
ロジックボードとバッテリーを分ける
ボトムケースにくっついているバッテリーとロジックボードは、さらに分解を進めるため回路がショートしないようこの2つを分離する必要がありますが、AppleはiPadと同じようロジックボードの下にバッテリーコネクタを配置しており、
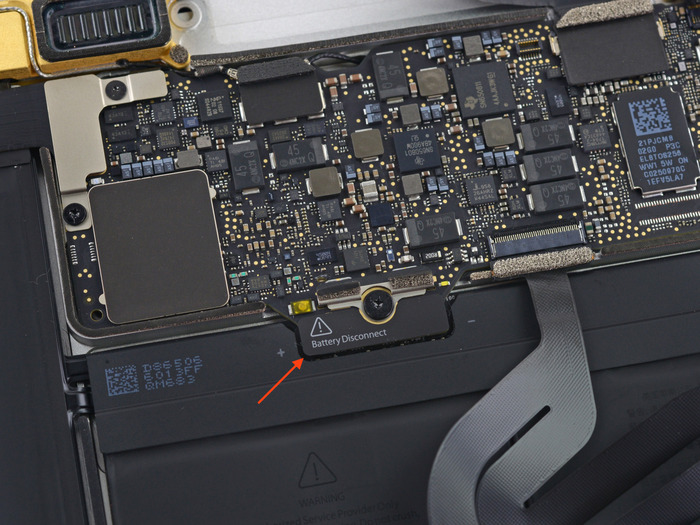
We’ve seen something like this before—in the iPad, Apple loves to hide the battery connector under the logic board. This is the first time we’ve seen it in a laptop, so it looks like it’s time for…
一旦ロジックボードと電力源”juice”を分けるため、ピックの先を2つに割ったような”Battery Isolation Pick“を使用して切り離します。(ヒンジ周辺にまだネジ止めされたパーツが有るため注意)
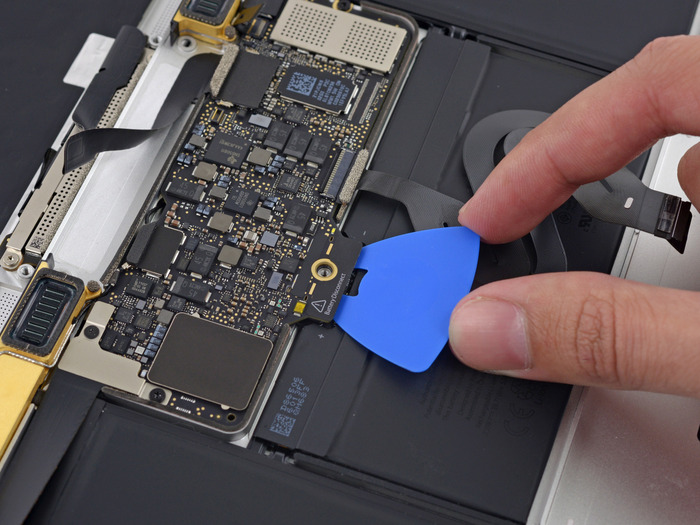
Our newly-minted battery isolation pick turns out to be just the trick we need to keep the juice away from the logic board’s spring contacts.
USB-Cポートの取り外し
新しいMacBookはディスプレイ, 電源, I/Oポートの全てをUSB-C ポートにまとめていますが、このUSB-Cポートとロジックボードは”5-point pentalobe screws”ともう1つ”tri-wing screw“で固定されており、これを外す必要があります。
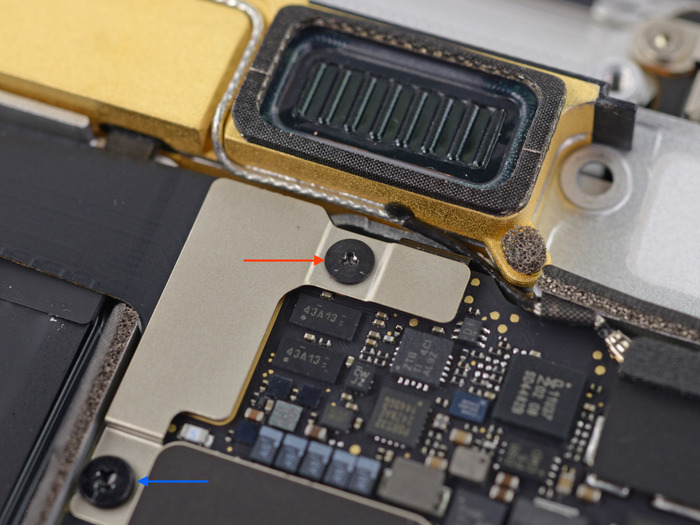
In our quest to begin the Great Cable Disconnect of 2015, we find a tri-wing screw!
We finally disconnect the 3-in-1 display/power/I/O port cable that runs to the MacBook’s lone USB-C port.
ディスプレイとオーディオポートの取り外し
新しい薄型Retinaディスプレイとヘッドホンとデュアルマイクが接続されている”audio board”をピンセットで外し、これでやっとロジックボードからキーボード、感圧タッチトラックパッド、ディスプレイを取り外すことが出来ます。
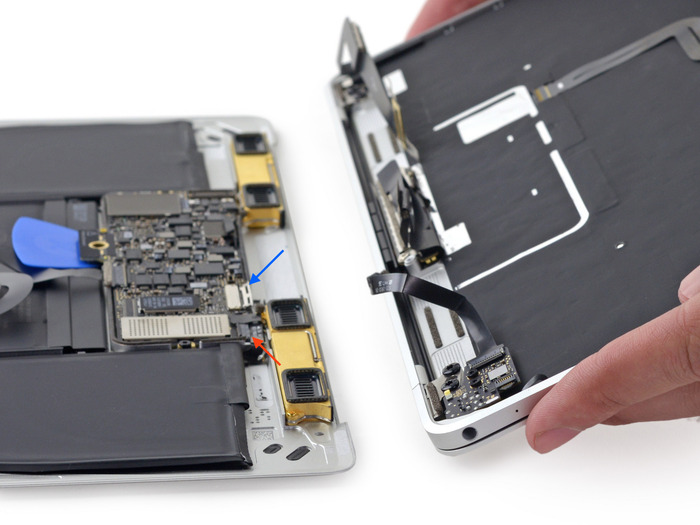
We guessed that the thinnest Retina display ever would come with some other changes—but this is one weird display connector!
We tweeze away the “audio board” connector that ties in the headphone jack and dual microphones.
Finally, the two halves are free to fly. Now it’s time to get to that logic board!
ロジックボードとヒートシンク
ロジックボードを取り外すとボトムケース側にIntel Core Mが覆われたヒートシンクがあり、(ちなみに先ほど”Battery Isolation Pick”を使用し分離させていたバッテリーとロジックボードは9点で接地されているようです)
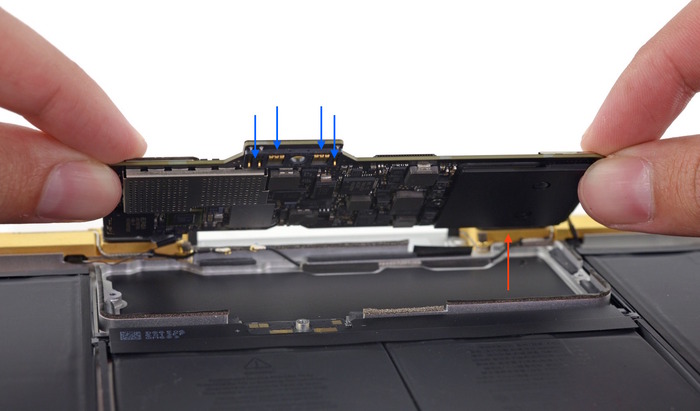
We carefully lift the lovely logic board from its aluminum nest.
Apple’s use of the new Intel Core M processors allows for smaller form factors and fun little heat sink covers.
ヒートシンクはロジックボードとの接地面を増やすため、綺麗に機械加工されており(画像を見るとチップコンデンサを避けるように溝が掘られ、その間を縫うようにヒートシンクとロジックボードの接地面があります)、3本のネジを外すことでIntel Core Mにアクセスできます。
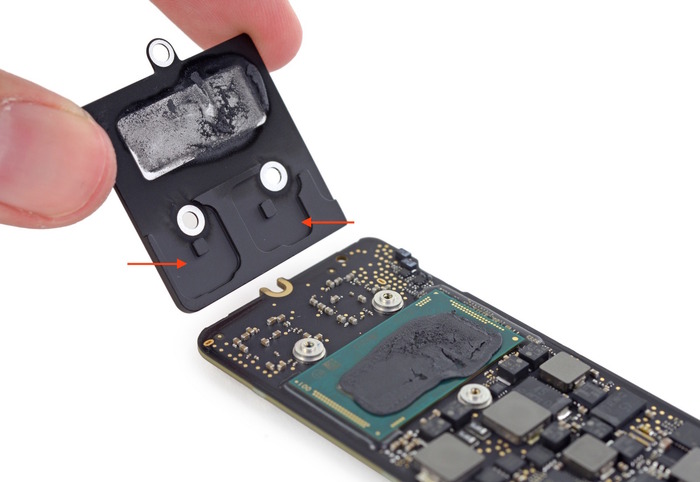
The heat sink is nicely machined to provide multiple points of contact on the logic board—perhaps even to cool the reverse side of the logic board a bit.
ロジックボード
MacBook Airより67%小さくなった新しいMacBookのロジックボードにはIntel SR23G Core M-5Y31, Elpida/Micron FB164A1MA-GD-F 8 GB LPDDR3メモリ, Toshiba TH58TFT0DFKLAVF NB2953 128GB SLC NAND Flash memory(表裏)を使用したSSDが搭載され、SSDのWrite速度が振るわないのもこのNANDメモリ数によるものだと考えられます。
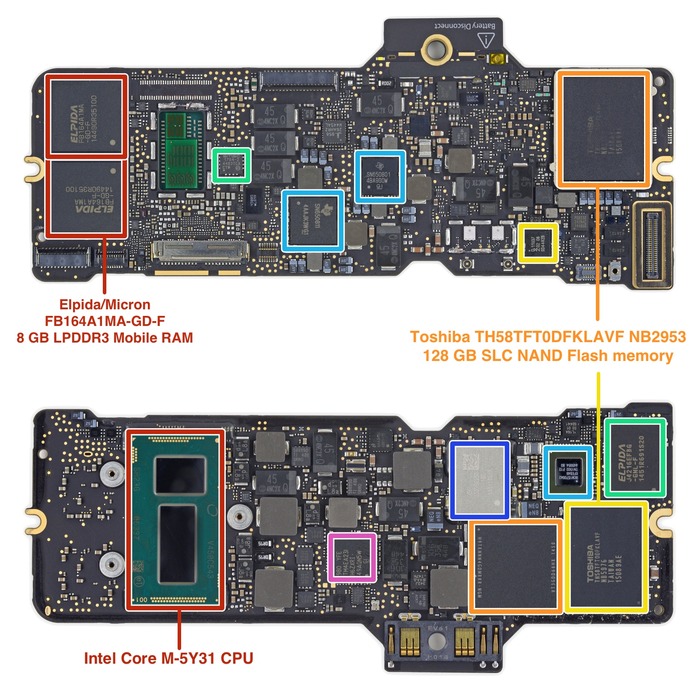
Intel SR23G Core M-5Y31 CPU (Dual-Core, 1.1 GHz, Turbo Boost up to 2.4 GHz) with Intel HD Graphics 5300
Elpida/Micron FB164A1MA-GD-F 8 GB LPDDR3 Mobile RAM
Toshiba TH58TFT0DFKLAVF NB2953 128 GB SLC NAND Flash memory (+ 128 GB on the reverse side for a total of 256 GB)
また、Wi-Fiモジュール”339S0250″は村田製作所製で、iPad Air 2に使用されている”339S02541″と同じラインナップ上のモジュールだと思われます。
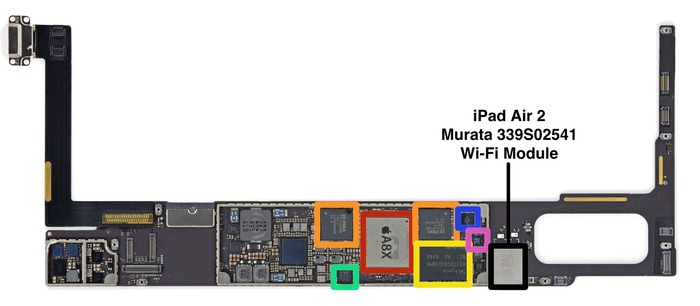
Murata 339S0250 (Likely an iteration of the 339S02541 Wi-Fi module found in the iPad Air 2)
バッテリーは接着剤で
新しいMacBookのバッテリーはバッテリーシートを「段状のデザイン”Terraced Battery”」にし通常よりも35%大きいバッテリー容量を実現していますが、このバッテリーはMacBook Pro (Retina, Early 2015)と同じく接着剤で固定されているためユーザーが取り替える場合はボトムケースを温め接着剤を弱め、(iFixitはiOpenerという電子レンジで温めるツールを使っています)
Apple’s new terraced battery technology is supposed to provide 35% more battery cell capacity than would have been possible before.
iOpener on a lower case? This just feels weird…
粘着力が弱まったところでカードを入れて擦りながら剥がします。
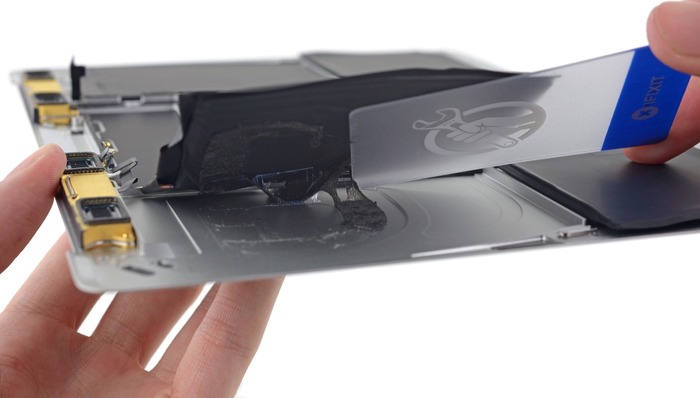
Scrape, peel, scrape, peel. Look at all that nasty adhesive.
ちなみに”Terraced Battery”は「ポータブルデバイス内空間の効率的なバッテリーセル活用法」として特許を取得しているようです。
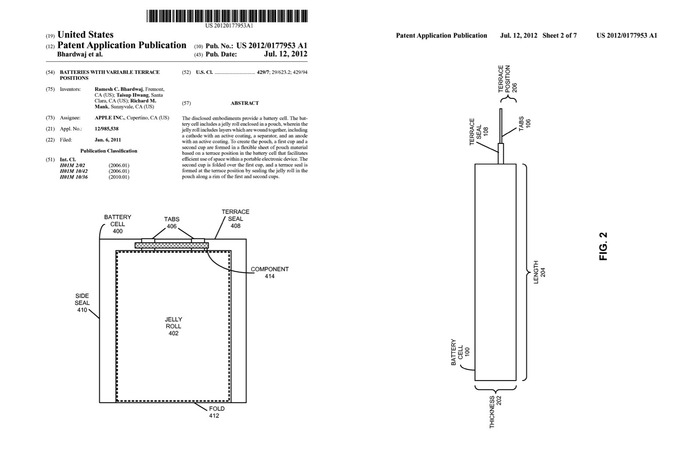
The disclosed embodiments provide a battery cell. The battery cell includes a jelly roll enclosed in a pouch, wherein the jelly roll includes layers which are wound together, including a cathode with an active coating, a separator, and an anode with an active coating. To create the pouch, a first cup and a second cup are formed in a flexible sheet of pouch material based on a terrace position in the battery cell that facilitates efficient use of space within a portable electronic device. The second cup is folded over the first cup, and a terrace seal is formed at the terrace position by sealing the jelly roll in the pouch along a rim of the first and second cups.
[特許 US20120177953 – Batteries with variable terrace positions – Google 特許検索]
この”Terraced Battery”は6枚のバッテリーセルはに分かれており、6枚全て接着剤で固定されており、そのバッテリーセルを区切るアルミニウムの壁がこの”Terraced Battery”を剥がすのを困難にしているそうです。
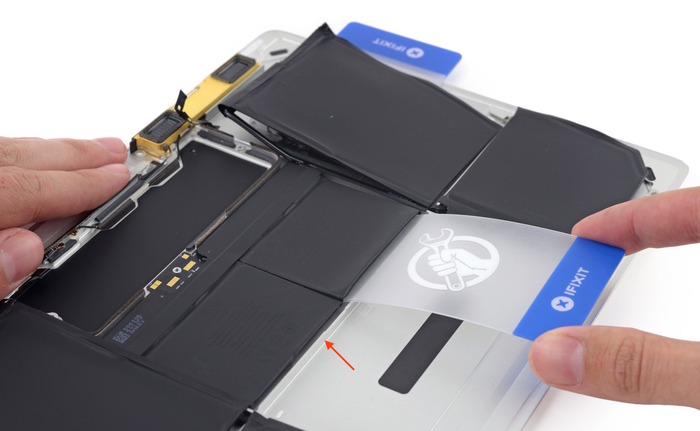
Ugh! Even the center cell of the battery is glued down, and we had hoped the sticky cells we found in the new 13″ MacBook Pro wouldn’t be a trend…
To complicate the procedure, the battery sits down in a well; the only safe place to pry is over this aluminum wall.
バッテリーセルの仕様は7.55V, 39.71Wh, 5263mAh(Assembled in China Model A1527)でMacBook Air 11インチモデルのバッテリーが5100mAhなのでAirより薄くなった筐体に同等の容量のバッテリーを詰め込んでいるようです。
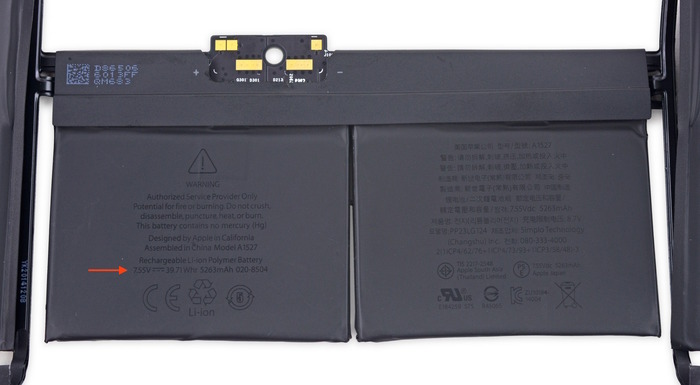
In order to power this slender gadget, Apple produced this form-fitting 7.55 V, 39.71 Wh, and 5263 mAh battery.
According to the specs, this is just a hair more than you get from this year’s almost-pudgy-by-comparison, 5100 mAh MacBook Air 11″—though Apple touts equal battery performance of up to nine hours surfing the net, or ten hours of iTunes video playback.
スピーカー&アンテナ
新しいMacBookのWi-Fi性能は転送レート867Mbpsの2ストリーム仕様で、このアンテナは左右に分かれたスピーカーユニットに収まっており、スピーカー自体には誘電体コーティングが施されているそうで、iFixitはこの誘電体コーティングされたスピーカーとアンテナの組み合わせが電力効率を最大限に活かすための特許かもしれないと予想しています。
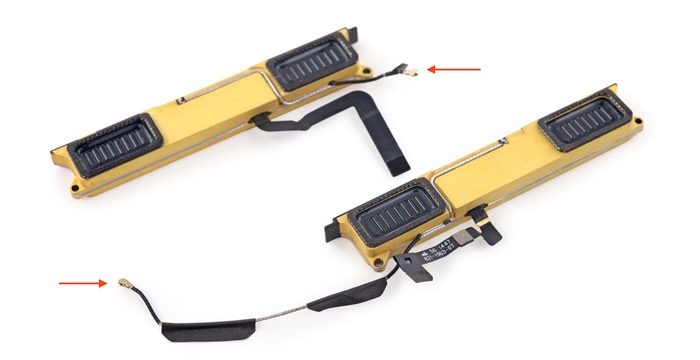
The treasure antennas sit in channels routed into each speaker assembly.
If this is a dielectric coating, some of Apple’s recent patents could suggest that Apple is using the speaker assemblies to form a compound antenna, helping maximize power efficiency in this smaller form factor.
新しいMacBook用の感圧タッチトラックパッド
ここでやっと分解の対象がボトムケース”lower case”からキーボードや感圧タッチトラックパッドが付いた”upper case”に移ります。新しいMacBookに搭載された感圧タッチトラックパッドはMacBook Pro (Retina, Early 2015)に搭載されている感圧タッチトラックパッドと少し違い[1, 2]スリム化されており
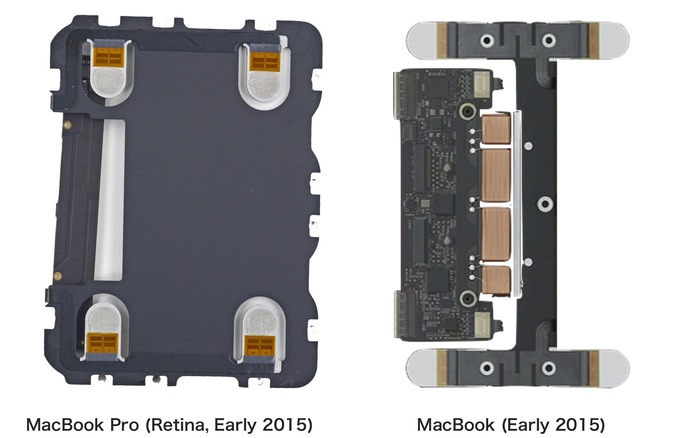
Finally, we reach one of the most talked-about trackpads in town. As we could expect, the Force Touch trackpad in the Retina MacBook looks like a slimmer, daintier version of the one we found in the 13″ MacBook Pro.
新しいMacBookに採用されている感圧タッチトラックパッドの圧力センサーにもゴム製の接着剤”rubbery glue”が使用されており、ひずみセンサー部分の半分にこの接着剤が付いているそうです。
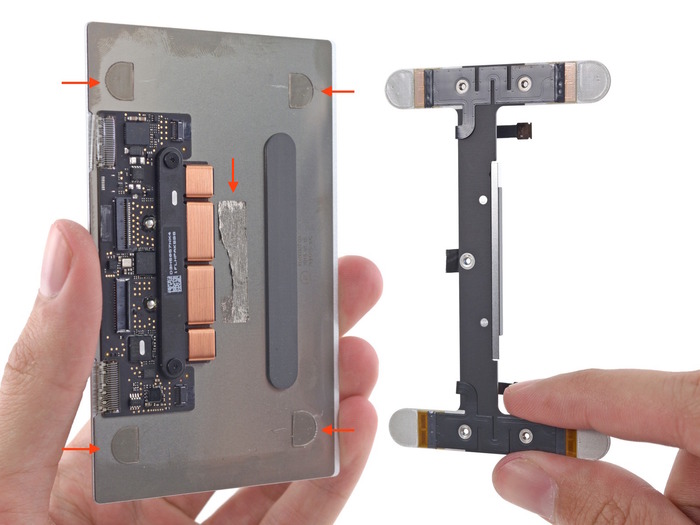
Ahah! Some strange rubbery glue was holding a cable over the second half of each strain gauge pair.
Taptic Engine部には3つのコントローラーがあり、それぞれ
・BroadcomのBCM5976 タッチセンサー用コントローラー
・ST Microelectronicsの32F103 ARM Cortex-M ベースのマイクロコントローラー
・Linear TechnologyのLT3954 LED パルス幅変調 (PWM) ジェネレータ
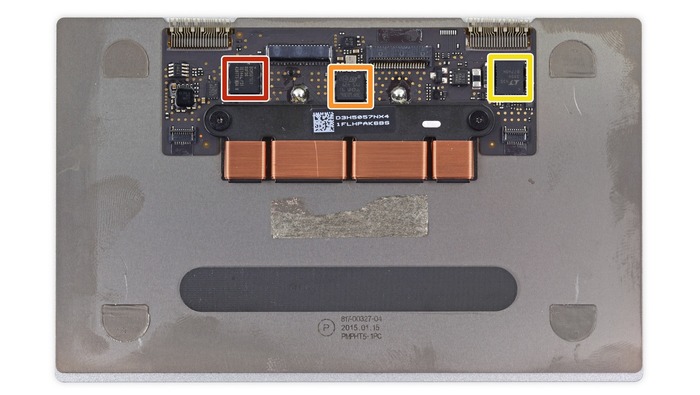
With the strain gauge bracket removed, we take a closer look at the chips powering this newfangled trackpad:
キーボード
新しいMacBookのキーボードは接着剤を使用したテープブランケットで覆われており、その下にはキーボードの上と下に1キー毎にPentalobesネジが2つづつあり、合計83個のPentalobesネジでキーボードを固定し、
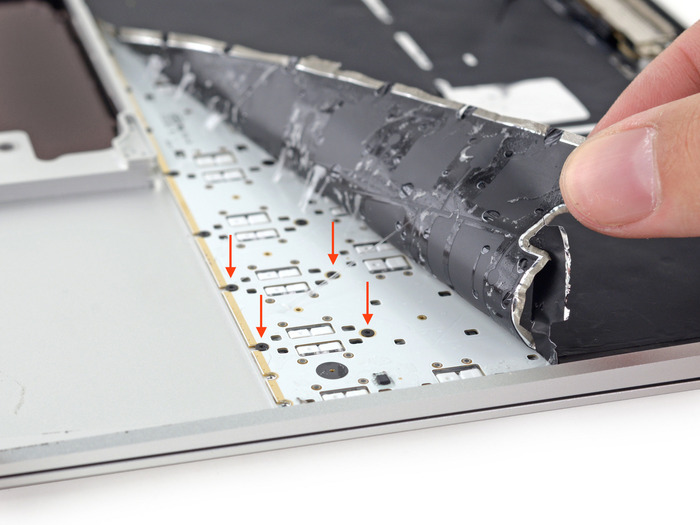
The adhesive backing (a kind of layered tape) is stuck to the keyboard, and barely holds together upon peeling.
[…]
Under the blanket of tape is a field of disheartening stars. Two pentalobes per key, plus a row at the top and bottom, for a total of 83, plus the three from before.
同時に各キー毎に設置されたLEDライトをコントロールするためのLEDコントローラー(PWM LED Drivers)が存在するそうです。
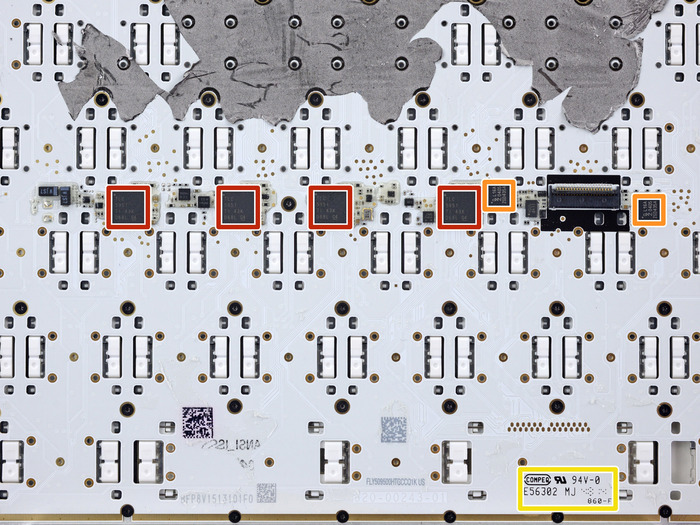
iFixitにはこの他にもUSB-Cやオードディオボードの分解写真や掲載されていますが、最終的にiFixitは修復性”Repairability”を10段階中最も難しい”1″としており、その理由として
・独自のPentalobesネジとケーブルの取り回しが分解を難しくしている
・最も使用されるUSB-Cポートはブラケットの下に”tri-wing”ネジで固定されている
・バッテリーはボトムケースに接着されている
・新しい12インチRetinaは1つのユニットとして分離できなくなっている
・CPU, メモリ, SSDはロジックボードに半田付けされている
などを挙げており、ユーザーが自分で交換できるパーツはほとんど無いようです。
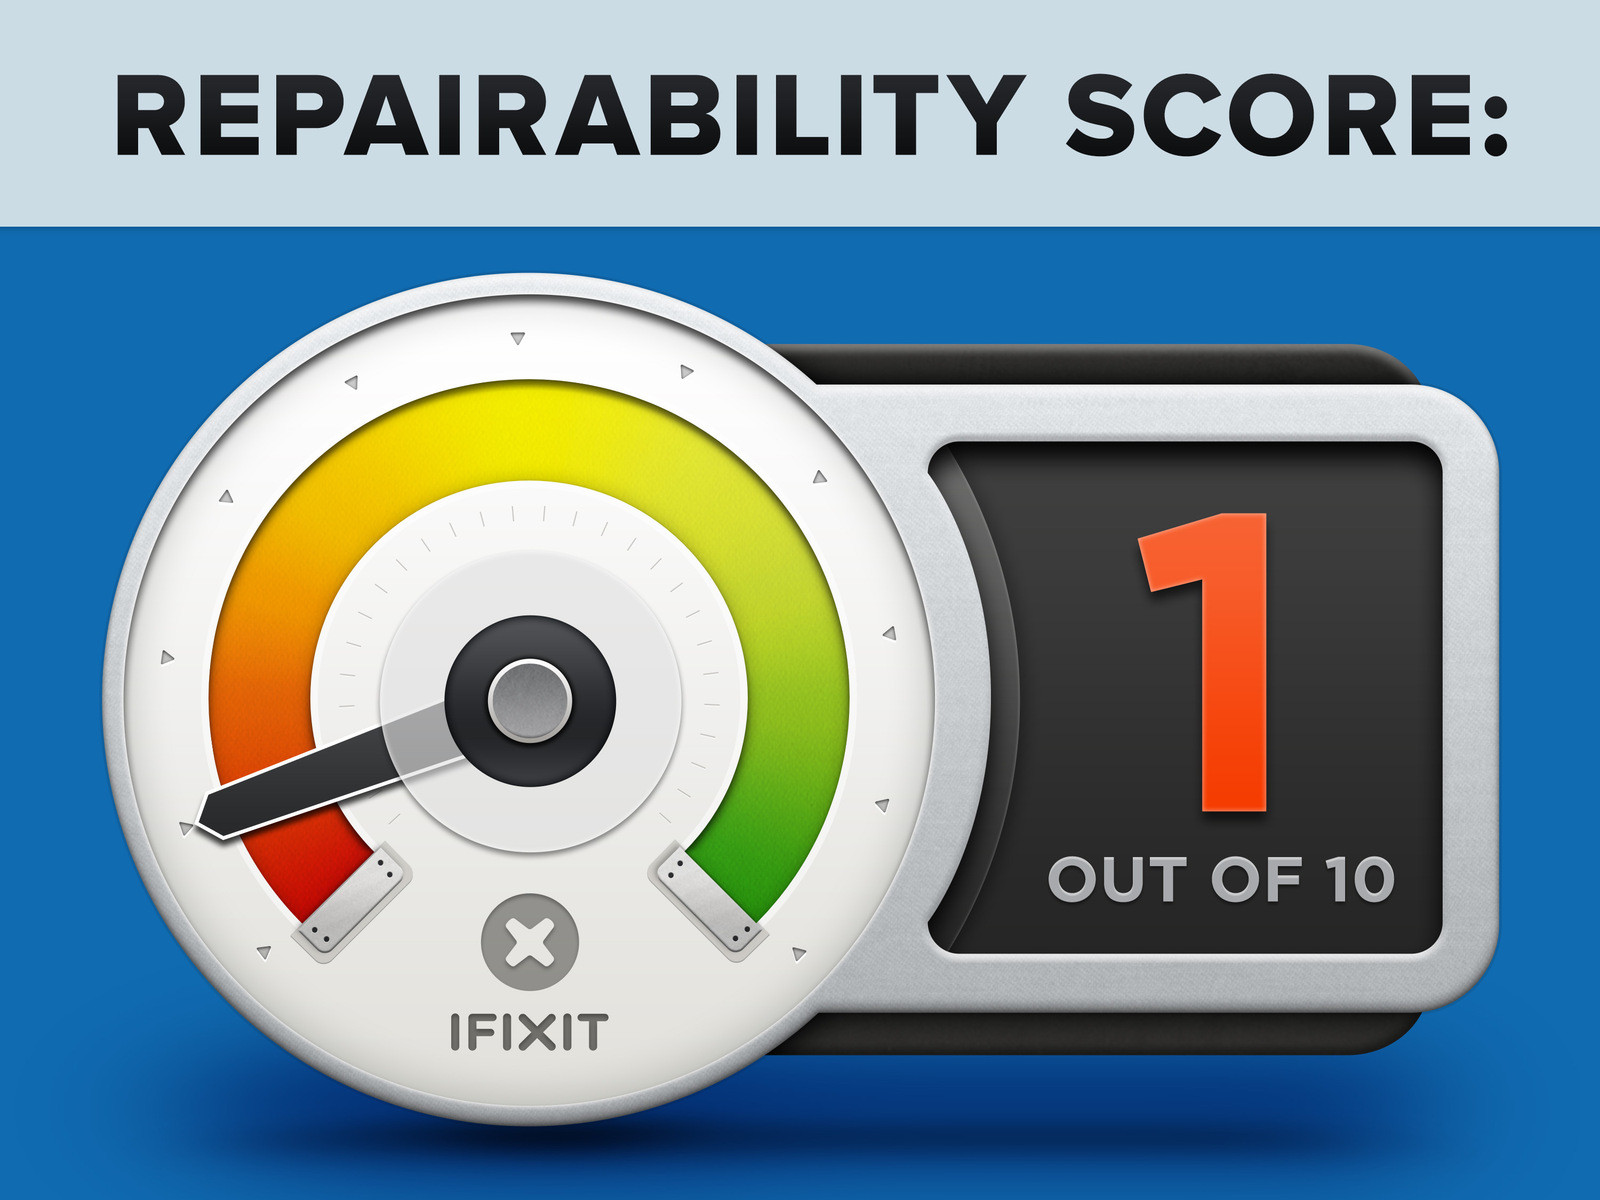
・Proprietary pentalobe screws continue to make opening the device unnecessarily difficult, and new cable routing makes the procedure even trickier.
・The USB-C port is secured by tri-wing screws, and buried under the display brackets, complicating replacement. Also, being the only port, it will experience more use and wear than a typical single-purpose port.
・The battery assembly is entirely, and very solidly, glued into the lower case.
・The Retina display is still a fused unit with no separate, protective glass. If the display needs replacing, it’ll cost a pretty penny.
・The processor, RAM, and flash memory are soldered to the logic board.
関連リンク:
・Retina Macbook 2015 Teardown – iFixit
・バッテリーユニットはMid 2013と同じで駆動時間は+2時間、iFixitのMacBook Air (Early 2015)の分解レポートから分かったことまとめ
・新しいSSDとバッテリーが採用され、ネジの数が減った。iFixitのMacBook Pro (Retina, Early 2015)の分解レポートから分かったことまとめ

![iFixit プロテックツールキット 精密工具セット [並行輸入品]](http://livedoor.blogimg.jp/applechinfo/imgs/a/b/ab255e7b.jpg)

コメント
特殊ネジほ良いとして、接着剤はやめて欲しい。
内部のアッセンブリーがiPadと同じくボンド接続になったのか…
Core Mで新しいMac mini作って欲しいけどちょっと心配だ
Surfaceシリーズも接着剤多用なんだよねぇ
薄すぎてネジを使えないのだろうなぁ
爪式(スナップフィット)も実はヨロシクナイ。
カードなどでコジ開けるんですが、時々折れるんですよね。爪が。
ネジが一番良いな。