FileVaultが有効になったMac mini (2018)では起動中にeGPUからの出力ができないため、直接プライマリディスプレイをHDMIポートに接続し、ログイン後にeGPUを接続する必要があると、米Sonnetが通知しています。詳細は以下から。
![]()
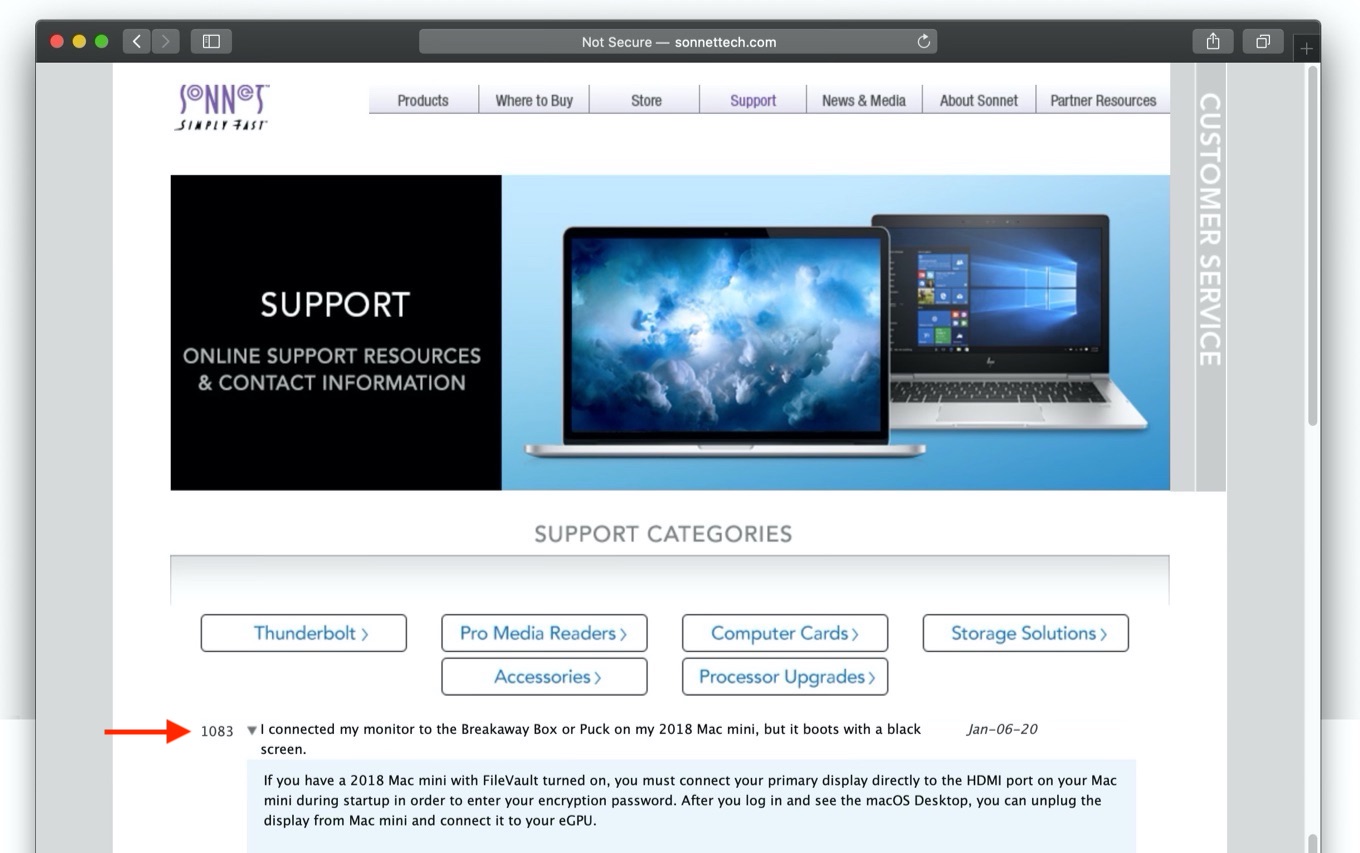
AppleのThunderbolt 3対応eGPU開発者用キット「External Graphics Development Kit」などを開発&販売しているアメリカの周辺機器メーカーSonnetは現地時間2020年01月06日、macOSのディスク暗号化機能「FileVault」が有効になったMac mini (2018)では起動中にeGPUからの出力ができないため、起動時には直接HDMIポートにプライマリディスプレイを接続し、ログイン後にeGPUを接続してディスプレイを接続し直してほしいとサポートドキュメントで通知しています。
Jan-06-20
- Q.I connected my monitor to the Breakaway Box or Puck on my 2018 Mac mini, but it boots with a black screen.
- A.If you have a 2018 Mac mini with FileVault turned on, you must connect your primary display directly to the HDMI port on your Mac mini during startup in order to enter your encryption password. After you log in and see the macOS Desktop, you can unplug the display from Mac mini and connect it to your eGPU.
eGFX Breakaway Box Support Library – Sonnet
この問題はSonnetのThunderbolt 3対応のエンクロージャ「eGFX Breakaway Box」に限った話ではなく、AppleがBlackmagicと開発した「Blackmagic eGPU」でも同様で、Appleは昨年からサポートドキュメントにSonnetと同様の記載をしており、
Mac mini (2018) で FileVault が有効になっている場合は、起動中に Mac mini に直接プライマリディスプレイを接続してください。ログインした後で、macOS デスクトップが表示されたら、ディスプレイを Mac mini から取り外して Blackmagic eGPU に接続できます。
Mac で Blackmagic eGPU を使う – Apple サポート
Appleによると、現在のところMacがmacOSの復元中、FileVaultが有効な場合のログイン時、ソフトウェア・アップデートのインストール中はeGPUが利用できないそうなので、特にヘッドレスMac(Mac mini)でeGPUをお使いのユーザーの方は注意してください。
おまけ
また、SonnetはMac Pro (2019)と互換性のあるNVMe SSDを4枚利用し最大8TBのRAIDストレージを構成できる「Sonnet M.2 4×4 PCIe card」の追加マニュアルに、非推奨ではあるものの、Double-Side SSDを利用する方法を公開しているので、利用しようと思われている方はチェックしてみてください。
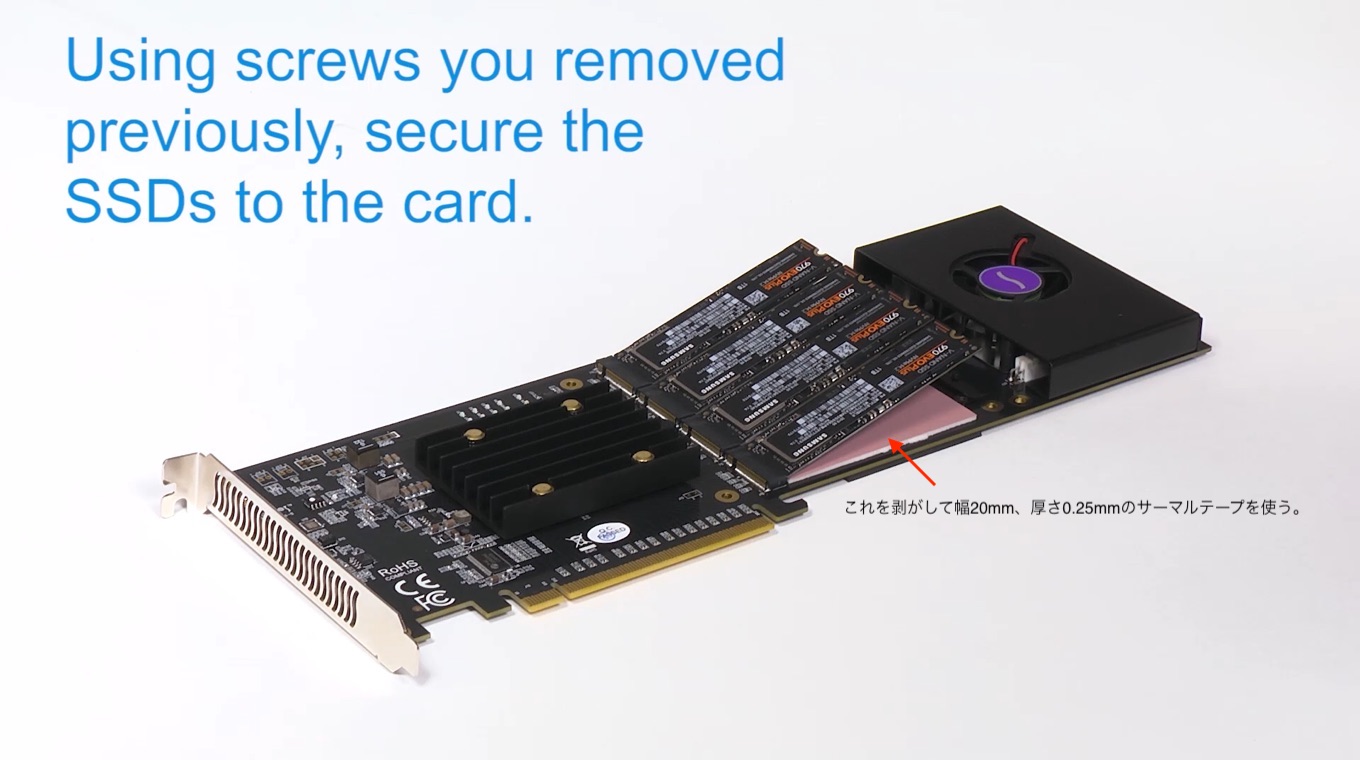
The thermal pad on the M.2 4×4 is pre-installed for single-sided SSDs. If you would like to use double-sided SSDs, you need to make a modification to the cooling system.
- Remove the thermal pad pre-attached to the PCIe card. (Do not remove the thermal pad pre-attached to the heat sink!)
- Get some thermal tape that is 20mm wide x 0.25mm thick. This is available on Amazon.
- Cut four 70mm strips of tape, peel off the bottom covers from the tape, and stick a strip of tape under each SSD position.
- Peel off the top covers from the tape.
- Install the SSDs in their sockets and screw them down.
Sonnet M.2 4×4 PCIe card Support Library – Sonnet
- Mac で Blackmagic eGPU を使う – Apple サポート
- eGFX Breakaway Box Support Library – Sonnet
- Sonnet M.2 4×4 PCIe card Support Library – Sonnet
コメント
APFSあたりからFileVault有効にすると鬼のように遅くなって、無効にすると何もなかったかのように速くなるから昔から有効にしてたが流石にやめた。
そもそも展示品にかかってない時点でパフォーマンスモロに落ちるって自白してるようなモンだったわ。
T2チップ搭載機ならFileVaultのパフォーマンスへの影響はゼロだが?