
Power Mac G4 Cubeの筐体をいじらずに美しい内部構造を3Dプリンターで作成した方がいるようです。詳細は以下から。

いまだに根強いファンがいるPower Mac G4 Cubeですが、tonymacx86スレッドのalbertodlhさんは1年前からこの構想を思いつき、eBayで動かなくなったG4 Cubeを購入、ケースを磨き、内部構造を測定、Adobe Fireworksでパーツの配置を検証。
The first thing I did was to buy an old, not working cube on eBay. I disassembled it and became familiar with the internal frame and how all the components were distributed.
The plexiglass case was full of scratches, and I had to sandpaper and polish it for days to make it look good again, but it was completely worth it. Mostly because I now have really sexy biceps.
After measuring the internal aluminum box, I started playing Tetris with figures sized like the components in Fireworks (Yes, I use Fireworks). I wanted to know where to put everything, minding a proper ventilation.
次にプレキシガラスの切断サービスでミスを防ぐために段ボールで内部構造フレームを再現し実際にパーツを配置。
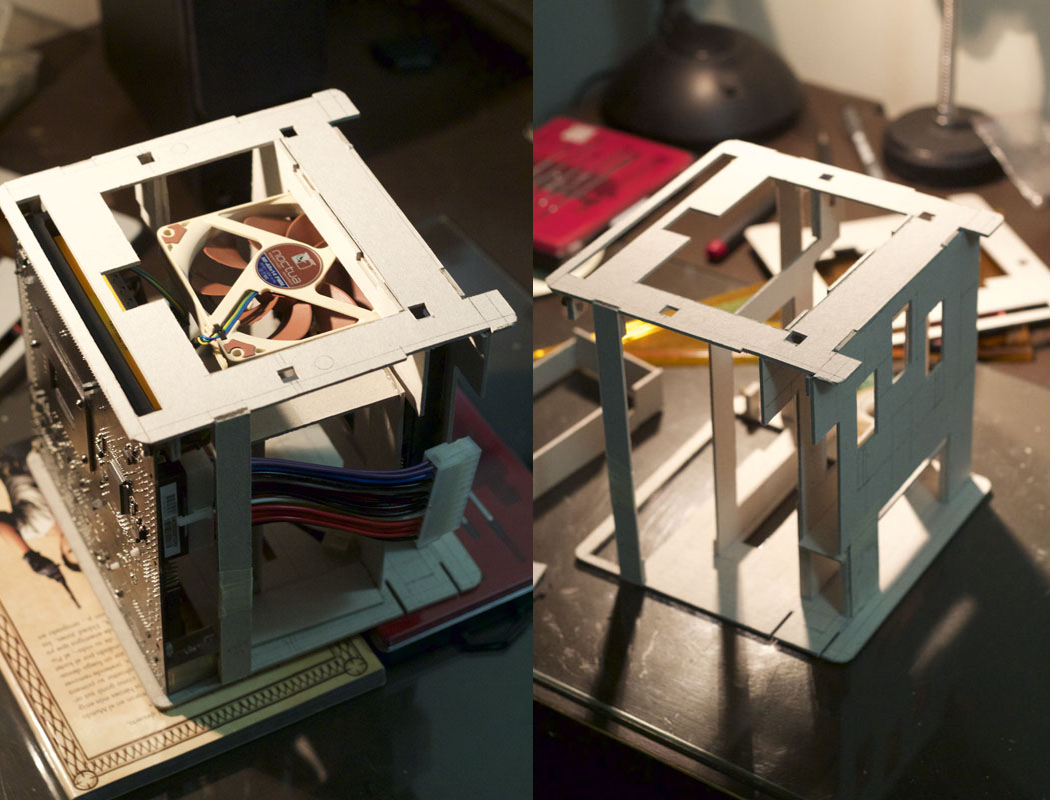
Second thing I did was to make a cardboard model of what was to be my replacement internal frame.
I did this because Plexiglass laser cutting services are expensive, and I wanted to test everything in order to avoid any possible measuring mistakes (which I had made).
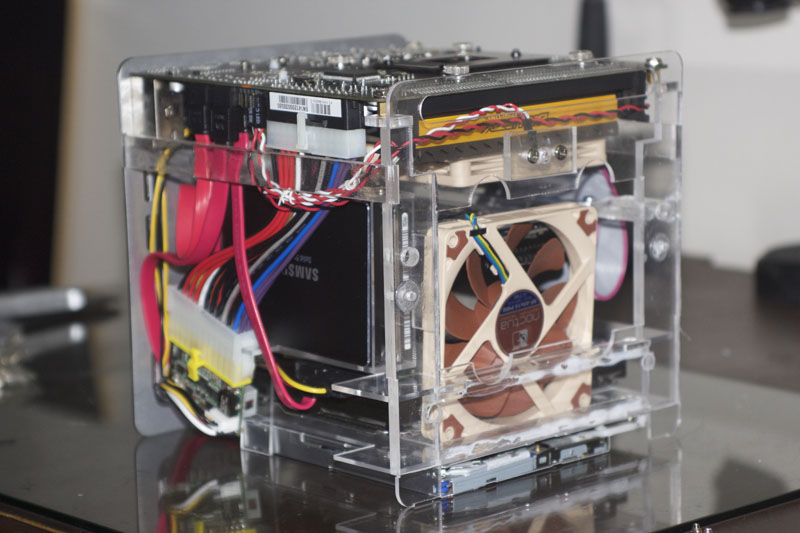
確認できた内部構造フレームをプレキシガラスの切断サービスへ依頼し、届いたフレームを組み立て。

I/OパネルもマザーボードやGPUのコネクターに合わせて配置され、
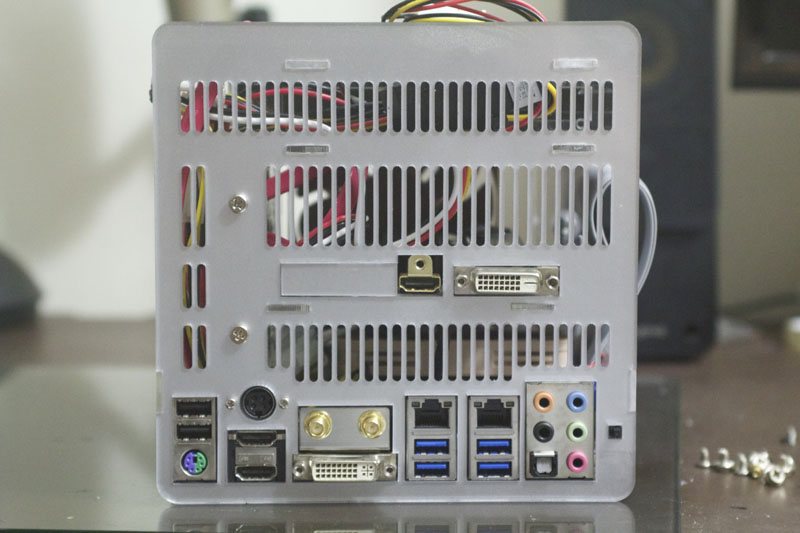
光学ドライブ、電源(picoPSU-160-XT)など全て収納できることが出来たそうです。
実際にPower Mac G4 Cubeの筐体に収めると以下の様になるそうで、今後更にタッチセンサー式のパワースイッチなどを導入していきたいそうです。

パーツリストは以下の通りで、光学ドライブ以外全てうまく動いているそうで、tonymacx86のスレッドには他の写真が掲載されているので興味のある方はどうぞ。
* Motherboard: Gigabyte GA-Z87N-WIFI
* CPU: Intel Core i5-4570S, 2.9 GHz
* CPU Cooler: Noctua Low-Profile CPU Cooler NH-L9I
* Video Card: I already had a slim Gigabyte GT 640, but my idea was to end up using an EVGA GTX 750Ti, so I needed to leave enough room for it to “breathe”.
* RAM: Crucial Ballistix Tactical Low Profile 8GB Single DDR3-1600 (x2)
* Hard Drives:
- Samsung 840 Pro Series 2.5-Inch 256GB SSD
- HGST Travelstar 2.5-Inch 1TB 7200RPM
- Seagate Barracuda 3.5-Inch 3TB 7200RPM
* Optical Drive: Hitachi LG HL CA10N 12.7mm Slot load (But, DON’T BUY THIS ONE! It’s loud and OS X won’t support native burn with this drive. I currently have to use Roxio Toast)
* Power Supply: Mini-Box picoPSU-160-XT, with 192w AC-DC Power Adapter
* Case Fan: Noctua 92 x 14 mm Low-Profile Cooling Fan (my original idea was to use it as exhaust on top, but ended up using it as intake. I’ll explain why later)
* Bluetooth: IOGEAR Bluetooth 4.0 USB Micro Adapter
* WiFi: Broadcom Wireless 802 11/a/g/n Internet WLAN Adapter.
関連リンク:
・Supercharged G4 Cube Mod: i5, GTX 750Ti and 3TB 3.5” HD in a cube!
![Mac Fan (マックファン) 2014年 12月号 [雑誌]](http://livedoor.blogimg.jp/applechinfo/imgs/2/8/28fec2ac.jpg)

コメント
プレキシガラスってアクリルのことか
切断面を綺麗に磨いて透明にしたらもっと見栄えがいいんだろうなぁ
消えた3Dプリンター